
諸事情により、ConoHa VPSを新たに1台追加契約しました。
VPS環境でDebian 12.5を設定するのは今回が初めてのため、備忘録として記録を残します。
公開鍵はVPSデプロイ時にインポート済です。
Conoha VPS パケットフィルタ等は、近日公開予定の親記事に記載します。

サーバー基本設定
1. 一般ユーザーの設定
初期状態ではrootユーザーのみ利用可能だったため、作業用の一般ユーザーを作成しました。
あわせてsudo権限を付与し、以後はrootへ直接ログインせず、一般ユーザーから必要に応じて管理操作を行えるようにします。
root@vm-xxxxxxxx-xx:~# adduser relay-ops
root@vm-xxxxxxxx-xx:~# usermod -aG sudo relay-ops
VPSデプロイ時に設定した公開鍵を、作成したユーザーのホームディレクトリへコピーしました。
root@vm-xxxxxxxx-xx:~# mkdir -p /home/relay-ops/.ssh
root@vm-xxxxxxxx-xx:~# cp /root/.ssh/authorized_keys /home/relay-ops/.ssh/
root@vm-xxxxxxxx-xx:~# chown -R relay-ops:relay-ops /home/relay-ops/.ssh
root@vm-xxxxxxxx-xx:~# chmod 700 /home/relay-ops/.ssh
root@vm-xxxxxxxx-xx:~# chmod 600 /home/relay-ops/.ssh/authorized_keys
※ConoHa VPSのDebian Linuxテンプレートではsudoコマンドは導入済でした。
2. SSH設定
SSHの設定ファイルを編集します。
root@vm-xxxxxxxx-xx:~# vi /etc/ssh/sshd_configrootログインとパスワード認証を無効化します。
以後は、作成した一般ユーザーで鍵認証ログインします。
SyslogFacility AUTHPRIV

PermitRootLogin no
PermitEmptyPasswords no
PasswordAuthentication no
設定変更後、sshd -tで構文エラーがないことを確認します。
root@vm-xxxxxxxx-xx:~# sshd -t構文エラーがなければ、SSHサービスを再起動します。
root@vm-xxxxxxxx-xx:~# systemctl restart ssh
3. ホスト名の変更
ホスト名を変更します。
root@vm-xxxxxxxx-xx:~# hostnamectl set-hostname relay.exiv.net
root@vm-xxxxxxxx-xx:~# reboot
変更後、DNSのAレコードおよびConoHa VPS側の逆引き設定も忘れずに更新します。
メール送信用途で利用する場合は、正引きDNSと逆引きDNSの整合性も確認しておきます。
4. タイムゾーン/時刻同期/ロケール設定の確認
タイムゾーンが Asia/Tokyo になっていること、時刻同期の状態を確認します。
root@relay:~# timedatectl

               Local time: Tue 2026-04-21 03:06:41 JST
           Universal time: Mon 2026-04-20 18:06:41 UTC
                 RTC time: Mon 2026-04-20 18:06:41
                Time zone: Asia/Tokyo (JST, +0900)
System clock synchronized: yes
              NTP service: n/a
          RTC in local TZ: no

root@relay:~# systemctl status systemd-timesyncd --no-pager
Unit systemd-timesyncd.service could not be found.

root@relay:~# timedatectl show-timesync --all
Failed to parse bus message: No route to host
NTP service が n/a だったため、systemd-timesyncd をインストールします。
root@relay:~# apt update
root@relay:~# apt install -y systemd-timesyncd
:(省略)
The following packages will be REMOVED:
  ntp ntpsec
:
The following NEW packages will be installed:
  systemd-timesyncd
:
インストール時に ntp/ntpsec は削除されていますが、今回はsystemd-timesyncdを使って外部NTPに時刻同期します。
root@relay:~# systemctl enable --now systemd-timesyncd
root@relay:~# systemctl status systemd-timesyncd --no-pager
:(省略)
systemd-timesyncd.service - Network Time Synchronization
  Loaded: loaded (...; enabled; preset: enabled)
  Active: active (running)
  Status: "Contacted time server ... (0.debian.pool.ntp.org)."
:
timedatectlコマンドでntp自動同期を有効化します。
root@relay:~# timedatectl set-ntp true
root@relay:~# timedatectl
:(省略)
Time zone: Asia/Tokyo (JST, +0900)
System clock synchronized: yes
NTP service: active
RTC in local TZ: no
:
root@relay:~# timedatectl show-timesync --all
:(省略)
FallbackNTPServers=0.debian.pool.ntp.org 1.debian.pool.ntp.org 2.debian.pool.ntp.org 3.debian.pool.ntp.org
ServerName=0.debian.pool.ntp.org
ServerAddress=208.88.66.8
:
システムロケールとキーボードレイアウトを確認します。
root@relay:~# localectl

System Locale: LANG=en_US.UTF-8
    VC Keymap: (unset)
   X11 Layout: jp
    X11 Model: pc105
キーボードレイアウトを英語配列に変更しました。私は英語キーボード愛好者です。
root@relay:~# localectl set-x11-keymap us pc104
root@relay:~# localectl
System Locale: LANG=en_US.UTF-8
    VC Keymap: (unset)
   X11 Layout: us
    X11 Model: pc104
5. vim設定(カーソル/BackSpace有効化)
私は、永遠のvi初心者。矢印キーとバックスペースがないと困る人。
root@relay:~# touch ~/.vimrc
root@relay:~# vi ~/.vimrc
以下の内容を~/.vimrcに記入して保存します。
set nocompatible
set backspace=indent,eol,start
作成したユーザーでも同様の作業を行いました。
6. アップデート
パッケージを更新します。
今回は初期構築直後のため、full-upgradeまで実行しました。
root@relay:~# apt update
root@relay:~# apt upgrade -y
root@relay:~# apt full-upgrade -y
root@relay:~# reboot
7. firewalldのインストール
初期状態では firewalld がインストールされていなかったため、インストールします。
root@relay:~# apt update
root@relay:~# apt install -y firewalld
root@relay:~# systemctl enable --now firewalld.service
root@relay:~# systemctl status firewalld --no-pager
まず、外部IPアドレスを持っているNICを確認します。
root@relay:~# ip -br addr
lo               UNKNOWN        127.0.0.1/8 ::1/128
eth0             UP             xxx.xxx.xxx.xxx/xx
続いて firewalld の状態と既定ゾーンを確認します。
root@relay:~# firewall-cmd --state
running

root@relay:~# firewall-cmd --get-default-zone
public

root@relay:~# firewall-cmd --get-active-zones
root@relay:~#
今回の環境では eth0が外部接続用NICだったため、eth0をpublicゾーンへ明示的に割り当てます。
root@relay:~# firewall-cmd --permanent --zone=public --change-interface=eth0
root@relay:~# firewall-cmd --reload
root@relay:~# firewall-cmd --get-active-zones
public
  interfaces: eth0
現在の設定ルールを確認
root@relay:~# firewall-cmd --list-all
public
  target: default
  icmp-block-inversion: no
  interfaces: eth0
  sources:
  services: dhcpv6-client ssh
  ports:
  protocols:
  forward: yes
  masquerade: no
  forward-ports:
  source-ports:
  icmp-blocks:
  rich rules:
public ゾーンに所属する通信に対して、SSH がサービス単位で許可されています。
現在、接続操作を行っているIPアドレスを確認します。
root@relay:~# who
relay-ops pts/0        2026-04-30 09:37 (xxx.xxx.xxx.xxx)
接続操作を行っているIPアドレスについてSSHを許可します。
root@relay:~# firewall-cmd --permanent --add-rich-rule='rule family="ipv4" \
   source address="xxx.xxx.xxx.xxx/32" service name="ssh" accept'
publicゾーンから一時的に、SSHの全体許可を外します。
root@relay:~# firewall-cmd --zone=public --remove-service=ssh別ウインドウでターミナルソフトを起動、SSHログインできるか確認します。
ログインできればOKです。publicゾーンからsshサービスの許可を永続的に削除します。
root@relay:~# firewall-cmd --zone=public --permanent --remove-service=ssh特定のIPアドレスから587/tcpを許可。
root@relay:~# firewall-cmd --permanent --add-rich-rule='rule family="ipv4" \
   source address="yyy.yyy.yyy.yyy/32" port protocol="tcp" port="587" accept'
最後に、publicゾーンのtargetをDROPに変更し、明示的に許可した通信以外を破棄する設定にします。
root@relay:~# firewall-cmd --permanent --zone=public --set-target=DROP
root@relay:~# firewall-cmd --reload
root@relay:~# firewall-cmd --list-all --zone=public
public (active)
target: DROP
icmp-block-inversion: no
interfaces: eth0
sources:
services: dhcpv6-client
ports:
protocols:
forward: yes
masquerade: no
forward-ports:
source-ports:
icmp-blocks:
rich rules:
rule family="ipv4" source address="xxx.xxx.xxx.xxx/32" service name="ssh" accept
rule family="ipv4" source address="yyy.yyy.yyy.yyy/32" port port="587" protocol="tcp" accept
8. 自動セキュリティ更新の確認と有効化
セキュリティ更新を自動適用するため、unattended-upgrades の状態を確認します。
root@relay:~# dpkg -l unattended-upgrades apt-listchanges | cat
dpkg-query: no packages found matching unattended-upgrades
Desired=Unknown/Install/Remove/Purge/Hold
| Status=Not/Inst/Conf-files/Unpacked/halF-conf/Half-inst/trig-aWait/Trig-pend
|/ Err?=(none)/Reinst-required (Status,Err: uppercase=bad)
||/ Name            Version      Architecture Description
+++-===============-============-============-========================================
ii  apt-listchanges 3.24         all          package change history notification tool
今回の環境では apt-listchanges は導入済みでしたが、unattended-upgrades は未導入でした。
そのため、unattended-upgrades をインストールします。
root@relay:~# apt update
root@relay:~# apt install -y unattended-upgrades
続いて、自動更新を有効化します。
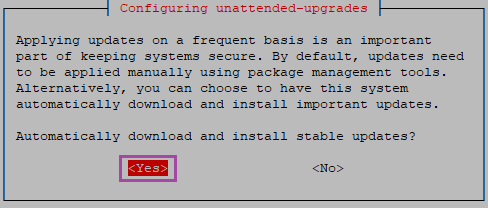
root@relay:~# dpkg-reconfigure -plow unattended-upgradesunattended-upgradesによる自動更新の有効化についての確認ダイアログが表示されます。
<Yes>を選択します。
設定ファイルを確認します。
root@relay:~# cat /etc/apt/apt.conf.d/20auto-upgrades
APT::Periodic::Update-Package-Lists "1";
APT::Periodic::Unattended-Upgrade "1";
APTの定期実行タイマーを確認します。
root@relay:~# systemctl status apt-daily.timer --no-pager
● apt-daily.timer - Daily apt download activities
     Loaded: loaded (/lib/systemd/system/apt-daily.timer; enabled; preset: enabled)
     Active: active (waiting) since Tue 2026-04-21 04:08:46 JST; 1 week 4 days ago
    Trigger: Sat 2026-05-02 22:06:46 JST; 4h 43min left
   Triggers: ● apt-daily.service

Apr 21 04:08:46 relay.exiv.net systemd[1]: Started apt-daily.…s.
Hint: Some lines were ellipsized, use -l to show in full.
root@relay:~# systemctl status apt-daily-upgrade.timer --no-pager
● apt-daily-upgrade.timer - Daily apt upgrade and clean activities
     Loaded: loaded (/lib/systemd/system/apt-daily-upgrade.timer; enabled; preset: enabled)
     Active: active (waiting) since Tue 2026-04-21 04:08:46 JST; 1 week 4 days ago
    Trigger: Sun 2026-05-03 06:04:37 JST; 12h left
   Triggers: ● apt-daily-upgrade.service

Apr 21 04:08:46 relay.exiv.net systemd[1]: Started apt-daily-…s.
Hint: Some lines were ellipsized, use -l to show in full.
root@relay:~# systemctl list-timers --all | grep apt
Sat 2026-05-02 22:06:46 JST 4h 43min left Sat 2026-05-02 10:01:41 JST 7h ago     apt-daily.timer              apt-daily.service
Sun 2026-05-03 06:04:37 JST 12h left      Sat 2026-05-02 06:44:41 JST 10h ago    apt-daily-upgrade.timer      apt-daily-upgrade.service
apt-daily.timer と apt-daily-upgrade.timer は、いずれも enabled かつ active (waiting) でした。
systemctl list-timers –all | grep apt では、次回実行予定が表示されているため、APTの定期処理が有効であることを確認できました。
動作確認としてDry-runを実行します。
root@relay:~# unattended-upgrade --dry-run --debug
  :
  :(省略)
  :
All upgrades installed
InstCount=0 DelCount=0 BrokenCount=0
The list of kept packages can't be calculated in dry-run mode.
実行後、ログファイルを確認します。
root@relay:~# ls -l /var/log/unattended-upgrades/
total 16
-rw-r--r-- 1 root adm    134 May  2 17:57 unattended-upgrades-dpkg.log
-rw-r--r-- 1 root root 11170 May  2 17:57 unattended-upgrades.log
-rw-r--r-- 1 root root     0 May  2 17:05 unattended-upgrades-shutdown.log


root@relay:~# tail -n 50 /var/log/unattended-upgrades/unattended-upgrades.log
  :
  :(省略)
  :
2026-05-02 17:57:16,226 DEBUG left to upgrade set()
2026-05-02 17:57:16,226 INFO All upgrades installed
2026-05-02 17:57:16,549 DEBUG InstCount=0 DelCount=0 BrokenCount=0
2026-05-02 17:57:16,550 INFO The list of kept packages can't be calculated in dry-run mode.
dry-run の結果として All upgrades installed が出力されており、処理が正常に完了しています。
今回は dry-run のため、実際の更新適用は行っていません。
9. 起動中サービスの確認
初期設定後に、現在起動しているサービスを確認します。
この確認では、サーバー上でどのサービスが動作しているかを把握し、意図しないサービスが起動していないかを確認します。
root@relay:~# systemctl --type=service --state=running --no-pager
  UNIT                        LOAD   ACTIVE SUB     DESCRIPTION
  acpid.service               loaded active running ACPI event daemon
  cron.service                loaded active running Regular background program processing daemon
  dbus.service                loaded active running D-Bus System Message Bus
  firewalld.service           loaded active running firewalld - dynamic firewall daemon
  [email protected]          loaded active running Getty on tty1
  [email protected]          loaded active running Getty on tty6
  polkit.service              loaded active running Authorization Manager
  qemu-guest-agent.service    loaded active running QEMU Guest Agent
  rsyslog.service             loaded active running System Logging Service
  [email protected]  loaded active running Serial Getty on ttyS0
  ssh.service                 loaded active running OpenBSD Secure Shell server
  systemd-journald.service    loaded active running Journal Service
  systemd-logind.service      loaded active running User Login Management
  systemd-resolved.service    loaded active running Network Name Resolution
  systemd-timesyncd.service   loaded active running Network Time Synchronization
  systemd-udevd.service       loaded active running Rule-based Manager for Device Events and Files
  unattended-upgrades.service loaded active running Unattended Upgrades Shutdown
  [email protected]           loaded active running User Manager for UID 1000

LOAD   = Reflects whether the unit definition was properly loaded.
ACTIVE = The high-level unit activation state, i.e. generalization of SUB.
SUB    = The low-level unit activation state, values depend on unit type.
18 loaded units listed.
初期設定段階では、SSH、firewalld、ログ、時刻同期、自動更新、VPS基盤関連のサービスが中心であることを確認しました。
TCP待受ポートを確認します。
root@relay:~# ss -ltnp
State      Recv-Q     Send-Q         Local Address:Port         Peer Address:Port     Process
LISTEN     0          4096           127.0.0.53%lo:53                0.0.0.0:*         users:(("systemd-resolve",pid=281,fd=18))
LISTEN     0          4096                 0.0.0.0:5355              0.0.0.0:*         users:(("systemd-resolve",pid=281,fd=12))
LISTEN     0          128                  0.0.0.0:22                0.0.0.0:*         users:(("sshd",pid=30761,fd=3))
LISTEN     0          4096              127.0.0.54:53                0.0.0.0:*         users:(("systemd-resolve",pid=281,fd=20))
LISTEN     0          4096                    [::]:5355                 [::]:*         users:(("systemd-resolve",pid=281,fd=14))
LISTEN     0          128                     [::]:22                   [::]:*         users:(("sshd",pid=30761,fd=4))
UDP待受ポートを確認します。
root@relay:~# ss -lunp
State      Recv-Q     Send-Q         Local Address:Port         Peer Address:Port     Process
UNCONN     0          0                    0.0.0.0:5355              0.0.0.0:*         users:(("systemd-resolve",pid=281,fd=11))
UNCONN     0          0                 127.0.0.54:53                0.0.0.0:*         users:(("systemd-resolve",pid=281,fd=19))
UNCONN     0          0              127.0.0.53%lo:53                0.0.0.0:*         users:(("systemd-resolve",pid=281,fd=17))
UNCONN     0          0                    0.0.0.0:68                0.0.0.0:*         users:(("dhclient",pid=689,fd=7))
UNCONN     0          0                       [::]:5355                 [::]:*         users:(("systemd-resolve",pid=281,fd=13))
初期設定段階では、SSH、systemd-resolved、dhclient の待受を確認しました。
22/tcp はSSH、53番はローカルDNS、5355番はLLMNR、68/udp はDHCPクライアントの待受です。
SSHは全アドレスで待ち受けていますが、firewalld 側で接続元IPを制限しています。
(おしまい)

コメント